Of the many pests to set up home in your indoor plants, thrips might just be the worst. They can be tricky to get rid of with their long lifecycle needing more frequent, repeat treatments. Not to mention the fact that female thrips can reproduce without a mate, so just one can be very bad news and fast (with one female able to lay hundreds of eggs).
Weird fact: There's no such thing as a thrip. Whether you have one or many, both the singular and plural is thrips with an 's'. A common time for thrips to cause havoc for houseplant hobbyists is a change of season, usually in spring and again in autumn. And as part of our continued grammar lesson today, it's correct not to capitalise seasons.
What are the signs a plant has thrips?
The first sign of thrips may be plants that are just failing to thrive. You might notice yellowing or browning of leaves focused nearer the middle of the leaves instead of the edges, as thrips concentrate on feeding near the midrib. The marks left behind are normally stippled and silvery grey at first, fading to yellow then brown later. You might spot tiny black spots where thrips have made holes in order to lay eggs. As they suck out the sap from the leaves, you might also notice limp, wilted, twisted or curling leaves that's not caused by or responds to watering. Their faeces may also be visible as black spots usually found underneath leaves.
Thrips do have a pupa stage where they hang out in your soil, but the damage is done during the larval and adult stages where they make a meal of your foliage and lay eggs inside plant tissue.
Coming up after these photos below showing thrips damage, is help to ID the thrips themselves and how to get rid of them if your plants are infested...
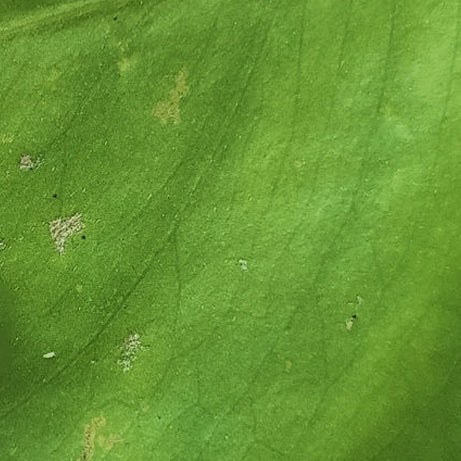
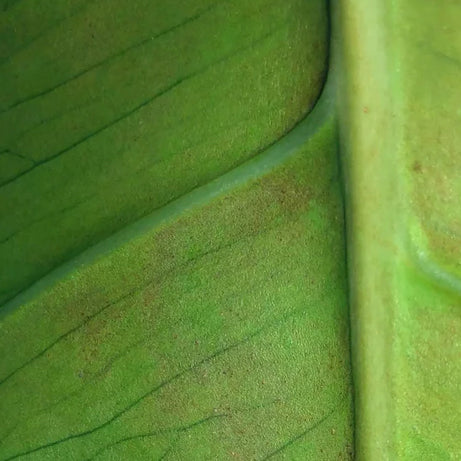
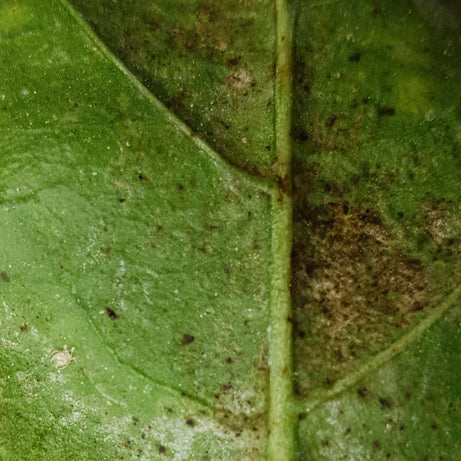
Photos of thrips damage on leaves
Above: thrips faeces (black dots) and silvery, pitted leaf damage caused by thrips
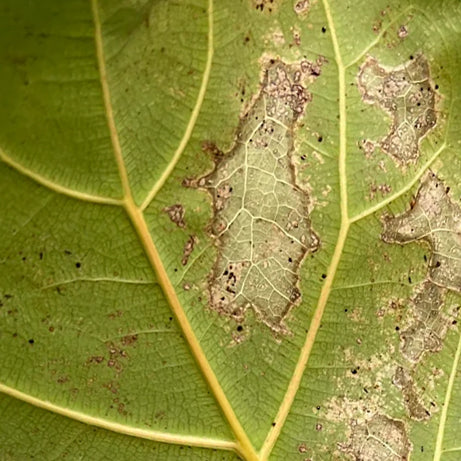
Above: brown, pitted, stippled leaf damage caused by thrips
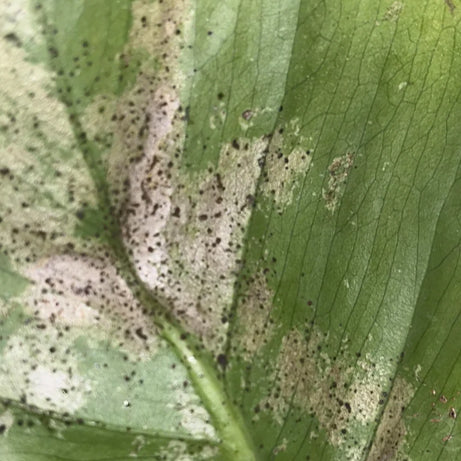
Above: damage from a heavy infestation of thrips

Above: thrip faeces (black dots) and silver, stippled thrips damage
Above: a mix of new (silver) and older damage (brown) as well as thrips faeces (black dots).
Above: silver and brown pitted damage on leaves from thrips as well as thrips faeces (black dots) with adult thrips visible (black flecks)
What plants do thrips prefer?
In my experience thrips have a fondness for Monstera, Fiddle Leaf Figs and Philodendron in particular but could be making a meal of any of your indoor plants.
Where do thrips feed?
Tender new foliage and sometimes new buds and flowers is a favourite hang-out spot in particular to look for thrips. The excitement of a new leaf unfurling disappears pretty fast when you discover thrips have been having a party inside. One tip to help you identify them is to hold a piece of white paper under the plant and shake. You may dislodge some thrips and be able to ID them better once they're on a white background (if you have good eyesight or a magnifying glass).
How do thrips damage plants?
Adult thrips lay eggs INSIDE the leaves and other tissues of the plant. As gross as that sounds, that's not what causes the most harm to houseplants. Although to lay each egg the female does cut a slit in the leaf surface which does cause damage. But when the harm really starts is the hatched babies (nymphs) start feeding by sucking the life out of the leaves. Those nymphs or larvae cause more damage than the adults because they are higher in numbers and also less mobile so feed in more concentrated areas.
What does the most harm is how they feed. Plant-eating thrips have tiny, needle-like mouthparts they use like a straw. They feed by rupturing the outer layer of plant cells and sucking up the contents of the cell. The way they feed causes scarring and pitting to the leaves and their little dark poops like droplets of tar are another tell-tale sign.
Will thrips damaged leaves heal?
Sadly no, thrips damage is permanent. Your plant can't heal itself. Those spots, holes and discoloured patches won't go away, but the wilting and curling might improve.
What's the thrips lifecycle?
Thrips can go from eggs to adult stage in as little as 8 to 15 days but adults are long lived, an average of 45 days (the range is around 2 to 6 weeks). Laying 2 to 10 eggs every few days means female thrips can lay 80 to 300 eggs in their lifetime. Their long egg-laying stage combined with laying so many eggs is why they should be dealt with the moment you suspect them as thrips have the ability to build up to large numbers fast.
What do thrips look like?
At the larvae or nymph stage they are paler, smaller and don't yet have wings, making them often confused with springtails. Adults are larger, darker and do have wings (depending on the species), but aren't skilled flyers. You're more likely to notice them crawling than taking flight.
The larval or nymphs and the adults aren't the easiest to spot. Adults are a bit easier to see on lighter foliage as they are usually dark brown to black in colour. Nymphs or larva are easier to spot on darker foliage as they are often pale straw coloured (pale yellow to white). They are pretty small though so you're more likely to spot them by the damage they cause, or by their poop!
Although large than the nymphs, adult thrips are still difficult to see with the naked eye. About 0.5mm to 14mm in size. As far as our houseplants are concerned, most adult thrips average about 1mm in length and are long and thin, like a tiny grain of yellow or black rice trotting around on your plant's leaves. At the larvae or nymph stage they also look like aphid castings, but on close inspection you should see they're moving (aphid skins don't move). Your best chance of seeing them moving is early morning and early afternoon when they're more active.

Above: The white flecks are young thrips with pitted, stippled leaf damage visible also
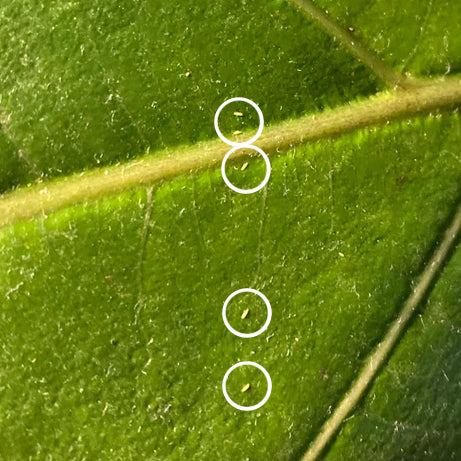
Above: close-up of thrips nymphs (circled)
How to treat for thrips on indoor plants
STEP ONE: ISOLATE
The good news is thrips are sensitive to insecticides. The bad news is you'll normally need repeat treatments, close together. They are also quick to spread so the first thing to do if you suspect thrips is isolate the plant as well as others nearby. It's likely they'll all need treating, plus catching them early makes them much easier to get rid of, so it's best to assume the plant's neighbours are also infested as treat everyone nearby just in case.
Trying to kill the eggs is wasted energy as they are safely buried by the females, protected inside plant tissue. Focus your efforts on the larvae or nymph stage, and the adult stage. And repeat! The keys to winning the war against thrips is isolation to stop them spreading, and repetition of treatment.
STEP TWO: WATER WASH
This step just needs water. Hose the plant down with a nice strong stream of water outside, under the shower or in the sink. This helps dislodge as many nymphs and adults as possible before you treat. You ideally want to avoid the soil getting wet so you don't accidentally over-water or just shift the thrips into the soil, so I'd cover the soil with tinfoil or similar just in case.
Weird tip: For sturdy, smooth-leafed plants like Fiddle Leaf Figs, Philodendrons and Monstera, you can use a lint roller first over the surface of the leaves like a sticky trap to remove thrips from the leaf surface fast. It's surprisingly effective (and satisfying!).
STEP THREE: INSECTICIDE SPRAY
Once that's done, if it's a minor infestation or you're diligent with weekly treatment, a thorough spray with neem oil or mineral oil may be all you need. If you opt for neem, you do need insecticidal neem. Not all neem are concentrated enough in the active ingredient (azadirachtin), that makes neem a natural insecticide.
The brand I use is Grosafe BioNeem but if you can't get that one, look for one that's a registered insecticide and makes insecticide claims on the label. Grosafe's neem oil is also certified for organics.
The reason I've put 'and' in italics is because there are lots of neem oil products on the market that claim to be insecticides without any tests or proof, so that registered part really does matter, as most neem products work as mild repellents only (and a great leaf shine) not as an insecticide*
*Companies who claim their neem is an insecticide but haven't tested or proven it (usually because their neem isn't high enough in the active ingredient), are the reason you'll often find plant parents saying neem oil didn't work for them.
Another effective option is an insecticidal mineral oil. My go-to is Enspray 99. That particular brand is registered and also certified for organics. If you're going in guns blazing with both a contact insecticide and a systemic insecticide (which I strongly recommend for thrips), then Enspray 99 and Groventive can be mixed together to cut down on extra, separate spray treatments (more about systemics and Groventive coming up).
Whether you go for neem oil or mineral oil, dilute as per the directions then apply the mixture heavily with a very fine spray mister, especially concentrating on the underside of the leaves where the adults hang out.
I like the Good Clean Health Co Mister 360 but if your budget doesn't stretch to that quality, the Egmont 360 Mister costs less and is almost as good, or Grosafe makes a ready-to-use Enspray-99 with spray mister included with the Enspray, which is the same type of mister as the Good Clean Health type. You want really good coverage and a normal mister's droplets are simply too big to get everywhere it needs to. The 360 type spray misters are super fine and far more effective.
Once all foliage is thoroughly covered and dripping with your treatment of choice - top of leaves, bottom of leaves, stems and all - it's time to wipe or wash it off. Yes, you want to do the spraying step somewhere the dripping oil and water mixture won't cause any problems (the bath or shower or outside for example).
I leave the plant for a good 5 to 10 minutes at this stage for the neem oil or mineral oil to do its work. You can either now wipe off or wash off the spray (and dead nymphs and adults along with it), or you can repeat spray first. After a repeat spray, wait 5 more minutes. Then wash down or wipe it off after the second spray instead. Even if you don't have the time to repeat spray every time you treat, I'd do it at least the first time and once more in your 5 week treatment plan.
Although stinky, neem oil is a gentle, well tolerated treatment even for sensitive plants (although keep in mind some plants like palms can be sensitive to oil-based treatments). Although neem oil or mineral oil are two of the best sprays for thrips control, insecticidal soap is another option.
If you suspect your plant may be sensitive, like with all treatments, do a spot test first on a small area a couple of days before treating the rest of the plant to test for any reactions. Any plant that is under moisture stress from being under-watered or inconsistently watered will be more sensitive, so it's worth watering first, then treating after the plant's recovered from the moisture stress a day later.
KILL TIP: Thrips dislike high humidity. Like way high, around 100%. For a badly infested plant, after spraying you can enclose the plant in a plastic bag to get that humidity really high. Just check the plant's health regularly while enclosed.
STEP FOUR: TRAPS
For indoor plants, sticky traps are well worth using between treatments. I like the UBloomd green sticky traps but the old trusty yellow sticky traps do the job too. Thrips seem to also be attracted to blue sticky traps if you can get them. Every single female adult a trap catches can represent up to 300 fewer thrips! Skipping this step can mean you'll need to extend the 5 week plan. Not a must, but worth it if it's a bad infestation, you've caught it late, or you don't want to take any chances.
STEP FIVE: SYSTEMIC
If you're diligent and patient, repeating step three weekly will usually be enough. Thrips are sensitive to insecticides. BUT if you're just not taking any chances, you find you're not getting on top of them and they keep coming back, or you're worried about missing a week, you definitely want to add this step, which is to use a systemic insecticide. I'll skip this step with some pests, but with thrips I always use a systemic.
This type of insecticide gets into the plant and kills as new thrips hatch and feed. Neem, mineral oil, insecticidal soap and most other insecticides are contact insecticides meaning to kill they require contact with the pest. A systemic is longer-acting and works best on the emerging young nymphs and larvae not the adults.
My systemic of choice is Groventive made by Grosafe. It's best to apply at the start, then once again 2 weeks later into your 5 week treatment plan. You can also mix Enspray-99 and Groventive together so you don't have to apply two treatments of your contact and systemic insecticides separately.
Keep in mind all these treatments are mixed with water and sprayed on all foliage including stems and under leaves. I recommend covering the soil with tinfoil or similar so you don't end up over-watering your plants.
STEP SIX: REPEAT!
Thrips are definitely NOT a spray and walk away pest. You MUST repeat at least step 3 above or newly hatched nymphs will soon be adults that start laying the next round of eggs. This part sucks but I recommend treating once a week for at least 5 weeks.
This is one reason thrips are one of the most challenging pests to get rid of. It doesn't help how easily they spread or that the females can lay eggs without mating. Most people (I'm guilty of this also), don't keep up with the frequency. If you don't or are worried you might miss a week, then treating with a systemic like Groventive is more of a must for you along with your contact insecticide of choice, and remember those sticky traps in-between.