Orchids in general are much easier care than they get credit for (I promise). Especially the most popular indoor orchid, Phalaenopsis (said 'fa-lah-nop-sis), aka the Moth Orchid or just called 'Phals' for short. There are a few tricks to get them happy and healthy, so they re-bloom and produce those gorgeous flowers again (and again), that you first fell in love with...
Amazon links in this post may be affiliate links which means I may receive a commission for purchases made through links (but doesn't change the price you pay). Learn more
This guide is all about answering the most-asked orchid care question: How do I make my orchid flower again? including how to trigger flowering, when and where to cut flower spikes, why buds fail to flower, when to change from a foliage to a flower fertiliser, what to do after flowering, when to repot and more, all focused on tricks and tips for the gorgeous Phalaenopsis.
When do orchids flower?
The first thing to work out is when to expect your orchid to re-bloom. When you first got your orchid it was likely in full bloom. Because orchids can bloom for a good 3 months or so, sometimes longer, it's difficult to know when it started flowering.
Plus nurseries and growers work their magic to get orchids blooming out of season for sale all year round by carefully manipulating light, temperature, fertiliser and more. So your orchid might not re-bloom as soon as you think, or may surprise you and flower again really soon!
There are exceptions, but the natural orchid growth cycle usually sees leaf growth in summer and early autumn, a flower spike late autumn to early winter, then all going well, flowering in winter and spring. It takes on average 2 to 3 months from new growth appearing to a fully developed flower spike, ready to bloom.
Once a flower spike has started growing, it’s best not to rotate your orchid, as the spike will want to grow towards the light. If shifted, the spike will try to twist back towards the light. Support a new spike as soon as it’s long enough (if you'd like the flowers to bloom up above the plant, instead of arch down). You can use standard plant stakes and orchid clips (those are both available if you're in New Zealand), or if you're based overseas, I love these bendable orchid flower stakes too from Amazon, but the twist ties they come with aren't the best, so get yourself some of these orchid clips instead to use with them.
A clever tip when buying orchids is to look for one that still has some closed buds at the end of the flower spike, rather than one that is in full bloom with all flowers open. If your orchid's already in full flower at the store, it's hard to know if you'll have weeks or months ahead to enjoy those gorgeous flowers. But if you buy yours in bud, you'll typically have a good 2 to 3 months (or longer) of blooming ahead to enjoy.
How long do orchids take to bloom again?
A happy, healthy orchid will usually rebloom every 8 to 12 months but some will flower again in the same season (tips coming up below for how to get your orchid to bloom again right away).
Help, my orchid is dying!
Many first-time orchid owners worry their orchid is dying when the flowers wilt and die, or the flower spike turns yellow or starts to dry up. Orchids can flower for a very long time – about 3 months, sometimes longer – but flower spikes won’t last forever. This is part of the normal cycle for an orchid.
The plant itself isn’t dying. The flower spike is not your plant. Your plant is the leaves, crown, stem and root system. With basic care your plant will keep growing and re-bloom again for you :)
Should I cut the flower spike off my orchid after flowering finishes?
Flowers that have wilted and turned brown one-by-one should be removed from the flower spike (they will naturally drop off anyway if not removed). When all flowers are done, the usual advice is to trim the stem of the flower spike, but there are three options you can consider.
#1: Leave it
If your orchid's spike has lost all the flowers but the tip of the spike is still green, healthy and producing new buds, there’s nothing you need to do. With normal care, it should keep blooming for you.
Make sure to keep feeding a flower fertiliser like GT Orchid Focus BLOOM, or Dyna-Gro Bloom (both available in New Zealand), as flowering requires a lot of energy and a flower fertiliser helps top up your orchid’s tank, ready to fuel repeat flowering. For those not in NZ, you can get GT Orchid Focus Bloom here from Amazon also.
#2: Trim the flower spike only
If flowering has finished and the tip of the spike is turning yellow or dry, but the rest of the plant is looking healthy, you can attempt to make it bloom a second time in the same season, however the flowers may not be as big or bloom as long. Some growers feel forcing a second bloom can mean less successful blooms next season, others fine Phals in particular handle this fine.
Locate the nodes at the bottom of the stem of the flower spike. Nodes look like little nubs or bumps along the stem, below the peduncle. The peduncle is the part of the flower spike that the flowers grow off. This diagram should help:
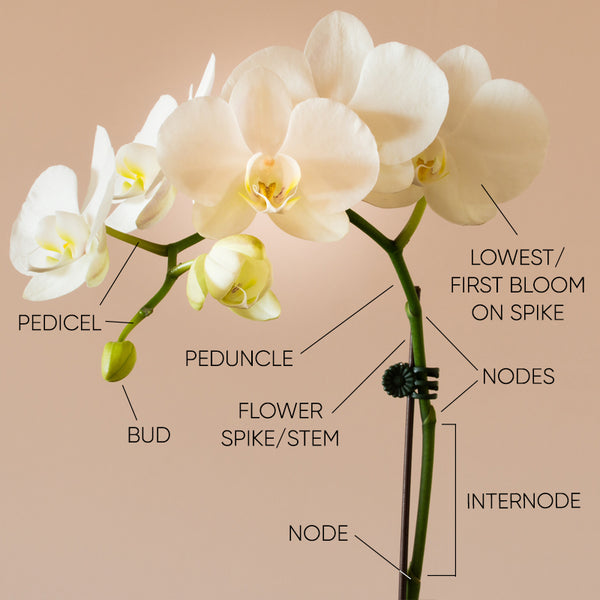
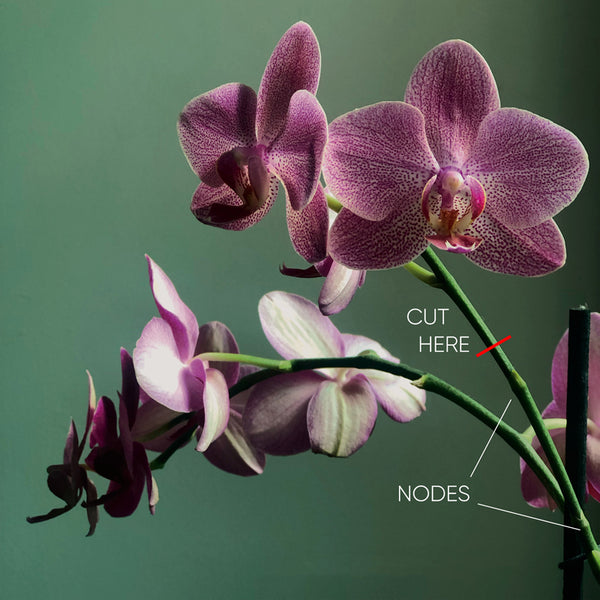
Look for the node that is closest to the lowest flower on the spike. With sterilised, sharp shears (I clean mine with hydrogen peroxide), cut through the internode. You want to cut about 1cm to 3cms above the node that's below the first flower, between the node and the flower.
The red lines below show two places you could cut when using this method - both are between the lowest flower and the first node below it - however when there are 2 flower spikes at once, it's often recommended to use method 2 on one spike, and method 3 on the other spike.
After you trim the flower spike, keep feeding a flowering fertiliser, like GT Orchid Focus BLOOM (also available here from Amazon if you're not NZ-based), to help fuel repeat flowering as it takes a lot of energy out of your plant.
#3: Trim the entire stem
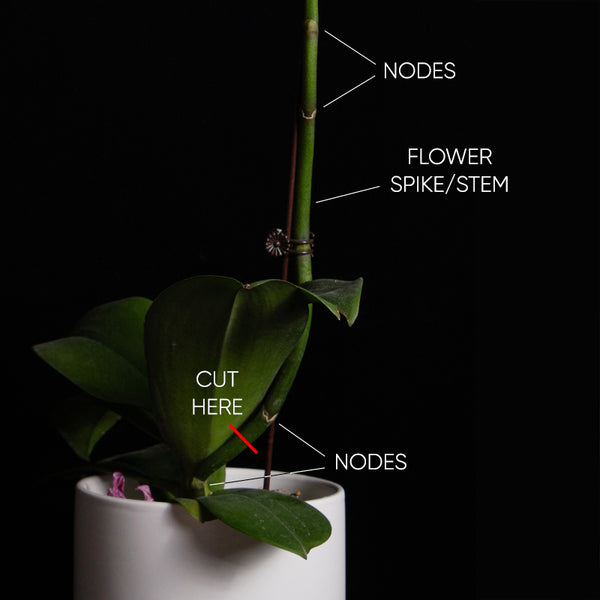
If your orchid isn’t looking its best, has already flowered twice, or needs a rest to focus on producing new, stronger roots and leaves, ready for bigger and better flowering next season: Cut the spike right down to the base, down close to the plant.
If you’re unsure how low to cut, or concerned about snipping the plant by accident, you can leave the bottom one to two nodes on the stem. Switch to a foliage fertiliser that supports root and leaf growth, such as GT Orchid Focus GROW or Dyna-Gro Orchid-Pro to help your plant recover.
Where do you trim if you have two flower spikes?
If you’ve been blessed with two flower spikes on your orchid at the same time, the usual advice is to cut one spike at the base (method 3 above), and the other spike 2cms or so above the first node (method 2 above).
Why won’t my orchid rebloom?
Reason #1 is light. If it’s the right time of year to see a new flower spike, then not enough light is the most common reason an orchid won’t flower. Just feeding a flower fertiliser can’t make an orchid flower if it isn’t getting everything else it needs. The reason you often see orchids on or near windowsills is it’s a good rule of thumb to give orchids the brightest light possible, without being in the path of direct sun (although a little weaker, direct sun in the early morning or late afternoon is usually enjoyed).
Reason #2 your orchid won't rebloom is fertiliser. Air, water and light are not enough. Orchids need 12 essential minerals and they rely on us to provide them. If there’s a deficiency, an orchid may not have the energy to fuel flowering, or may get as far as growing buds, but they drop without flowering (called bud blast).
Look for the most complete orchid fertiliser you can. Ideally you want to see nitrogen, phosphorus, potassium, calcium, magnesium, sulfur, iron, manganese, boron, zinc, copper and molybdenum all listed on the label.
GT Orchid Focus GROW (for roots and foliage), and GT Orchid Focus BLOOM (for flowers), are great options. Both are complete and balanced, including calcium, to meet the specific needs of orchids. Dyna-Gro Orchid Pro is another option. Those links are for my NZ plant friends, but if you're reading this overseas, you can get GT Orchid Focus Bloom here on Amazon too.
Reason #3 is temperature. The cooler night-time temperatures in autumn tell an orchid winter is on the way and helps trigger the flowering cycle to start now. Kept indoors in a heated home, your orchid may need you to artificially create those cooler nights. You want to aim for about a 10 degree difference between daytime and night-time temperature, but not lower than around 15 degrees overnight.
You could shift your orchid to a cooler, unheated room in the house temporarily (for around a month is ideal but at least 2 weeks). Some put their orchids outside, such as in a greenhouse, for a few weeks near the end of summer to start of autumn (just keep an eye on those lows in your region), bringing them indoors again once overnight temperatures start to drop below 15. You could also shift your indoor orchid near a window, and open the window overnight to get those cooler autumn night-time temperatures. Phalaenopsis orchids are the most popular indoor orchid because they prefer a similar temperature range to what we’re comfortable living in, between 15 to 29 degrees.
Why did my orchid's buds fall off before flowering?
This is called bud blast and can happen to your orchids for a few reasons, most often due to temperature, watering, light or a deficiency.
One cause of bud blast is a calcium deficiency. Calcium is one of the 12 essential minerals orchids require, yet most fertilisers do not include calcium. A calcium deficiency can cause bud blast, where orchid buds form but fail to bloom, drying up and falling off without flowering.
GT Orchid Focus BLOOM and GT Orchid Focus GROW both include calcium, and at the higher level that orchids require. Dyna-Gro Orchid-Pro and Dyna-Gro Bloom also include calcium, however not at the same level (Dyna-Gro averages under 20ppm calcium once diluted, compared to GT at over 80ppm).
Another cause can be watering, either under-watering or over-watering. Under-watering can cause the plant to dry out, and draw water back from the buds in order for the rest of the plant to survive. Over-watering can damage the roots, and if the roots aren't able to take up water, that can also cause your plant to draw water back out of the buds, causing buds to dry out and die.
Temperature can also cause bud blast in orchids, especially a sudden change. Watering with cold water - say NO to ice cubes! - can shock a plant and cause bud drop. A rapid change in air temperature can also cause buds to drop. Locate your orchid out of the path of your air conditioning or your heat pump. Keep an eye on hot blasts of air, such as in the kitchen (opening the oven for example), or being in the path of a fan heater.
When bringing an orchid home from the store, keep it warm and out of cold wind and direct sun on the journey home to avoid sudden temperature changes. If you've had your indoor orchid outdoors, bring it in before temperatures get too high or too low. Phalaenopsis prefer a range between 15 degrees and 29 degrees.
Light is another cause to watch for. Orchids need plenty of bright, indirect light in order to flower. As a general rule, give them the brightest light you can while avoiding direct sunlight touching them. Low light can prevent orchids growing a flower spike, or can cause buds to abort before flowering. Direct sunlight on buds can also scorch them and cause them to brown and die (although weaker winter sun, early morning or later afternoon sun is often okay).
How can I tell the difference between a flower spike and an orchid root?
A new root will be soft, rounded at the tip, and usually start out light green (although occasionally reddish) at the tip, which will change to silver as it grows. When you water, it will change colour, the same as established roots do. A new flower spike starts out more pointed and irregular in shape at the tip, usually green although can also be reddish, but it will stay green rather than change to silver. The shape at the tip is often described as a mitten.
How do I know if my orchid's getting enough light to flower?
Leaf colour is one way to check whether a moth orchid is getting enough light or not. Orchid leaves do vary in their shade of green, but a plant with darker green leaves than normal can be a sign of not enough light. Lighter more lime green to yellow-green leaves can be a sign of too much light (provided that's not the normal leaf colour for your plant of course, as they do vary).
If an orchid is going yellow starting with the older, lower leaves first that can be a sign of a mineral deficiency or unhealthy roots. Some orchids also develop a reddish colour to the underside or edges of their leaves which can also be a sign of too much light. You do need to know your plant's normal leaf colour to judge what the change in colour is telling you.
When should you change orchids from a grow to a bloom fertiliser?
Ideally you want to switch from a foliage fertiliser to a flower fertiliser before your orchid is due to produce a new flower stem. If your orchid hasn’t re-bloomed in your care yet, or you’re unsure when it’s due to flower, switch around mid-Autumn. Otherwise shift at the first sign of a new flower spike. Continue using a bloom fertiliser until your orchid finishes flowering, then shift back to a grow fertiliser.
It's the care you give, including what you feed, when an orchid is NOT flowering, that can be the key to unlock successful flowering next season.
If you haven’t been feeding at all, haven’t noticed any new root or leaf growth for a while, or your plant isn’t looking its best, it may not flower for you this season. To help your plant get back to full health, start on a foliage fertiliser first, like GT Orchid Focus GROW, then shift to a flower fertiliser like GT Orchid Focus BLOOM at first sign of a new flower spike. Or for those not in NZ, GT Orchid Focus Bloom is also available here on Amazon.
What’s the difference between a bloom booster and a bloom fertiliser?
Different fertiliser brands approach feeding for flowers in different ways, so it's best to check what the label says. A bloom booster like Dyna-Gro Mag Pro is normally added to your fertiliser. By itself, a bloom booster usually doesn’t provide all 12 minerals an orchid needs. A bloom fertiliser however is normally complete, and designed to be fed by itself, giving everything your orchid needs to support flowering, in one formula.
Some bloom fertilisers are ‘more complete’ than others. GT Orchid Focus formulas (linked above) take the second approach, providing orchids with everything they need, and nothing they don’t, all in one complete formula.
When should I repot my orchid?
Flowering matters when it comes to repotting also. It's best to avoid repotting when your orchid has an active flower spike in bud or in flower. Repotting during flowering can cause your orchid to abort their flowers in order to focus their energy on their roots to help recover after repotting. Wait until flowering is finished before you repot.
Thanks Mum
I grew up with orchids, indoors and out. My mother still has a big collection that bloom beautifully year after year. I caught the orchid bug, and years before my foliage obsession began with Philodendron, Pothos, Monstera and more, I had a collection of my favourites (Phalaenopsis Orchids are my pick), and would buy or be gifted one to mark special occasions. After finishing this guide, I think another visit to my local orchid nursery is in order!
Anna @lovethatleaf
PS: Shop all orchid supplies here >
Keep learning
The weakly weekly method is superb for orchids and all indoor plants. It's not quite what it sounds like. This guide explains the weakly weekly method
4 proven methods to get your fiddle leaf fig or ficus elastica to branch out, fill in and be bushier. Find out all 4 (with step by step instructions and photos)